Introduction
The goal of this tutorial is to create an editor and a list view for the notification entity from the
creating an entity type tutorial.
If there are problems with the tutorial, feel free to ask in the
Developer Mailing List.
Preconditions
This tutorial requires a project that is set up according to the tutorial creating an entity type.
Tutorial project access
The project that is the result of the tutorial is available in the subversion repository:
| basicEntityUI tutorial project | The project created in this tutorial |
| tutorial/basicEntityUI/trunk |
Adding the required plugin dependencies
Change the file "META-INF/MANIFEST.MF" to add the required plugin dependencies. It should be like this afterwards (the changed part is highlighted):
Manifest-Version: 1.0
Bundle-ManifestVersion: 2
Bundle-Name: TutorialProject Plug-in
Bundle-SymbolicName: TutorialProject; singleton=true
Bundle-Version: 1.0.0
Bundle-Localization: plugin
Require-Bundle: org.nomadpim.core,

 org.nomadpim.core.ui,
 org.eclipse.swt,
 org.eclipse.core.commands,
 org.eclipse.ui.forms,
 org.eclipse.core.runtime,
 org.eclipse.ui.workbench,
 org.eclipse.ui
Adding the category for the entity list view
Add a category in which the view will be listed by adding the following code to "src/model/plugin.xml":
   <extension point="org.eclipse.ui.views">
      <category name="%category.tutorial.name" id="category.tutorial"/>
   </extension>
Please note that you could have reused an existing category from Nomad PIM for adding your view
to that category. In that case, creating a view category is not necessary.
Adding the entity list view
Change the file "src/model/Entities.xml" to contain the code for the list view generation (the changed part is highlighted).
<entities
  xmlns:ui="http://nomadpim.org/xsd/ui"
  xmlns:persistence="http://nomadpim.org/xsd/persistence">

  <entity name="Notification" package="org.nomadpim.tutorial">
    <attribute name="Title" type="String"/>
    <attribute name="Text" type="String"/>
    <!-- Delay in seconds -->
    <attribute name="Delay" type="Integer"/>

    <persistence:file>org.nomadpim.tutorial.xml</persistence:file>

    <ui:listView category="category.tutorial" iconType="png" />

  </entity>

</entities>
This adds a generated list view for the specified category and the surrounding entity type.
The icon type will be explained later.
Adding a category for the create wizard
Add a category in which the create wizard will be listed by adding the following code to "src/model/plugin.xml":
  <extension point="org.eclipse.ui.newWizards">
    <category id="category.tutorial" name="%category.tutorial.name"/>
  </extension>
Please note that you could have reused an existing category from Nomad PIM for adding your create wizard
to that category. In that case, creating a wizard category is not necessary.
Adding the create wizard
Change the file "src/model/Entities.xml" to contain the code for the wizard generation (the changed part is highlighted).
<entities
  xmlns:ui="http://nomadpim.org/xsd/ui"
  xmlns:persistence="http://nomadpim.org/xsd/persistence">

  <entity name="Notification" package="org.nomadpim.tutorial">
    <attribute name="Title" type="String"/>
    <attribute name="Text" type="String"/>
    <!-- Delay in seconds -->
    <attribute name="Delay" type="Integer"/>

    <persistence:file>org.nomadpim.tutorial.xml</persistence:file>

    <ui:listView category="category.tutorial" iconType="png" />

    <ui:createWizard category="category.tutorial"
      icon="resources/icons/object_notification.png"/>

  </entity>

</entities>
This adds a generated list view for the specified category and the surrounding entity type.
The icon type will be explained later.
Creating the editor page
Add a line to the "src/model/Entities.xml" file:
<entities
  xmlns:ui="http://nomadpim.org/xsd/ui"
  xmlns:persistence="http://nomadpim.org/xsd/persistence">

  <entity name="Notification" package="org.nomadpim.tutorial">
    <attribute name="Title" type="String"/>
    <attribute name="Text" type="String"/>
    <!-- Delay in seconds -->
    <attribute name="Delay" type="Integer"/>

    <persistence:file>org.nomadpim.tutorial.xml</persistence:file>

    <ui:listView category="category.tutorial" iconType="png" />
    <ui:createWizard category="category.tutorial"
      icon="resources/icons/object_notification.png"/>

    <ui:editorPage />

  </entity>

</entities>
Now, you can create the editor page configuration in the "src/java" source folder. It is
important that the class is named "NotificationEditorConfiguration" and contained in the
package "org.nomadpim.tutorial".
package org.nomadpim.tutorial;

import java.util.List;

import org.nomadpim.core.ResourceFacade;
import org.nomadpim.core.ui.component.Section;
import org.nomadpim.core.ui.component.SectionBuilder;
import org.nomadpim.core.ui.editor.IEntityEditorConfiguration;
import org.nomadpim.core.util.text.IntegerConverter;

public class NotificationEditorConfiguration implements
        IEntityEditorConfiguration {

    public List<Section> createPropertyFieldConfigurations() {
        SectionBuilder builder = new SectionBuilder(new ResourceFacade(
                "TutorialProject"), Notification.TYPE_NAME);

        builder.addTextField(Notification.TITLE);
        builder.addTextField(Notification.DELAY, new IntegerConverter());
        builder.addTextArea(Notification.TEXT);

        return builder.getSections();
    }

}
The java code creates a section builder for your plugin and the notification entity type.
The order in which the text fields and areas are added determines their order in the user interface.
For non-String properties, a converter must be supplied.
Creating the launch configuration
The next step is to see Nomad PIM with the new entity type. Therefore, open the launch dialog using "Run >> Run..." and create a new Eclipse Application launch configuration. Configure the Main page of the configuration as shown in the next screenshot:
 |
 |
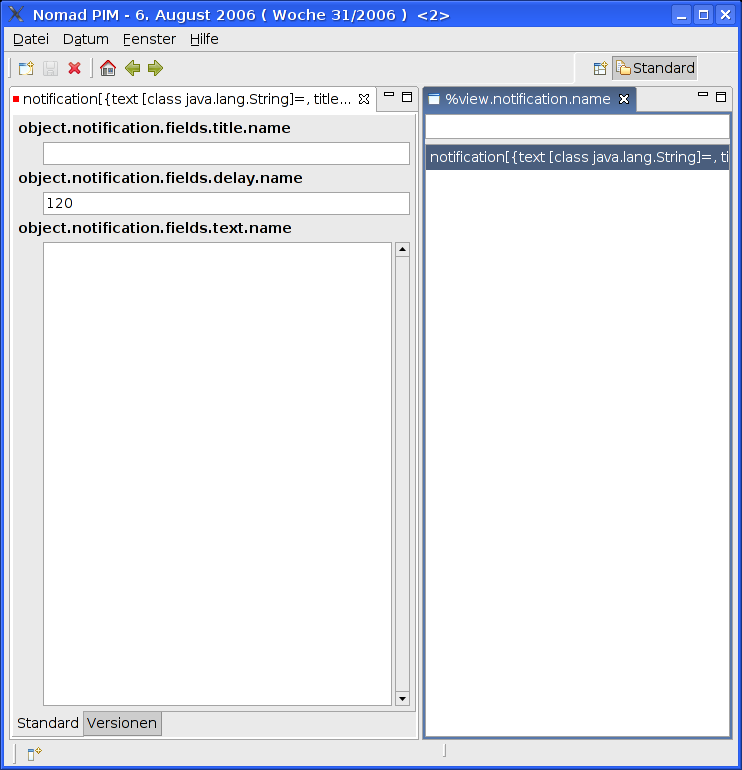
Launching Nomad PIM
By pressing "Run" in the dialog, you start Nomad PIM in a runtime workbench. There you can create a notification entity using the create dialog:
 |
 |
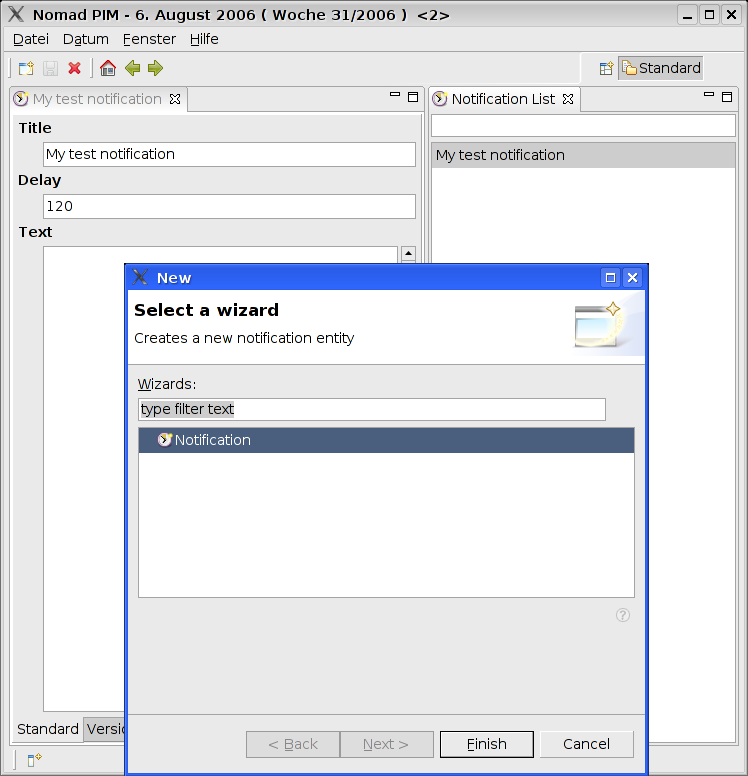
Adding descriptions
Currently, only the keys of the entries are displayed, but not the correct descriptions. The next step is to create the file "plugin.properties" with the following content:
category.tutorial.name=Tutorial

object.notification.name=Notification
object.notification.fields.title.name=Title
object.notification.fields.delay.name=Delay
object.notification.fields.text.name=Text

view.notification.name=Notification List

wizard.new.notification.description=Creates a new notification entity
The names from this file are looked up automatically. If you want to have titles in your
languages, create a file "plugin_XXX.properties", for example "plugin_de.properties" for German.
Adding the entity formatter
As you have probably noted, the title of the editor and the lines in the list view are not really readeable. They are the result of invoking the default toString() method of the entity, which returns all fields and values. Each entity type can have a formatter (it is planned that multiple formatters the use can choose from are allowed someday). To add the formatter, a formatter class, in this case "org.nomadpim.tutorial.NotificationFormatter" in "src/java", must be created:
package org.nomadpim.tutorial;

import org.nomadpim.core.entity.EntityPropertyFormatter;
import org.nomadpim.core.util.text.NullStringConverter;

public class NotificationFormatter extends EntityPropertyFormatter<String> {

    public NotificationFormatter() {
        super(new NullStringConverter(), Notification.TITLE);
    }

}
This formatter displays the title property of the entity, which is a String already and therefore does not need to be converted further. In general, an entity formatter must implement the interface "org.nomadpim.core.util.text.IFormatter<IEntity>".
To link the formatter to the framework, the file "Entities.xml" must be changed, too:
<entities
  xmlns:ui="http://nomadpim.org/xsd/ui"
  xmlns:persistence="http://nomadpim.org/xsd/persistence">

  <entity name="Notification" package="org.nomadpim.tutorial">
    <attribute name="Title" type="String"/>
    <attribute name="Text" type="String"/>
    <!-- Delay in seconds -->
    <attribute name="Delay" type="Integer"/>

    <persistence:file>org.nomadpim.tutorial.xml</persistence:file>

    <ui:listView category="category.tutorial" iconType="png" />
    <ui:createWizard category="category.tutorial"
      icon="resources/icons/object_notification.png"/>
    <ui:editorPage />

    <ui:formatter />


  </entity>

</entities>
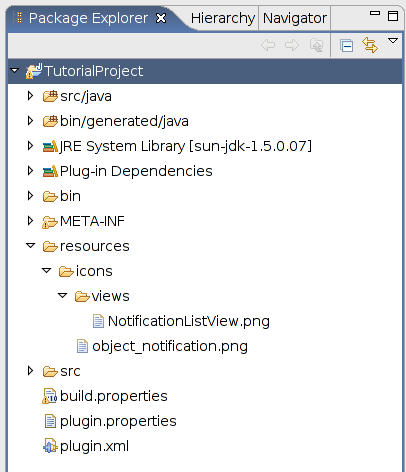
Adding icons
The last thing missing are the icons. At the Tango Desktop Project, many useful icons are available. For this tutorial, I used "appointment-new" in "16x16" and saved it as "resources/icons/object_notification.png" and "resources/icons/views/NotificationListView.png". Your project should look like this afterwards:
 |
<entities
  xmlns:ui="http://nomadpim.org/xsd/ui"
  xmlns:persistence="http://nomadpim.org/xsd/persistence">

  <entity name="Notification" package="org.nomadpim.tutorial">
    <attribute name="Title" type="String"/>
    <attribute name="Text" type="String"/>
    <!-- Delay in seconds -->
    <attribute name="Delay" type="Integer"/>

    <persistence:file>org.nomadpim.tutorial.xml</persistence:file>

    <ui:listView category="category.tutorial" iconType="png" />
    <ui:createWizard category="category.tutorial"
      icon="resources/icons/object_notification.png"/>
    <ui:editorPage />
    <ui:formatter />

    <ui:icon file="object_notification.png" />


  </entity>

</entities>
Taking a look at the result
Just run the Nomad PIM launch configuration again. The results should look like this:
 |
Congratulations!
You just integrated your first entity type in the Nomad PIM UI. You can now continue with Extend an existing entity type.